SLIDE1

Fiber Fun

All things Fiber and fluffy

Spinning

Ply it good!

All things Embroidery

Cross stitch and other stiches.

Knit, purl, sc2tog

All things created with yarn and some hooks

Weaving

Shuttles, waprs and more

Saturday, August 20, 2016

Magnets! Or Rigid Heddle Upgrade


When I was considering buying my now pre-loved Kormski Harp Loom I had been investigating its options. Before I swapped out this out over my Ashford Rigid Heddle I had to be sure it was worth it. It was the same size as my rigid heddle (80cm), fits Ashford Heddles (sweet!), folds (oh thank god that size of loom is insane to carry, I would hate to try the 120cm!). The only negative seemed to be the ratchet and tension. Kromski has now addressed that and all their new looms are now Kromski Harp Forte! The main difference being the plastic ratchet pawl system had been upgraded to a metal one that included a rare earth magnet that acts as a lock system similar to the Ashford one. They also sell upgrades for older looms. So I spent the evening pimping out my Harp Loom to a Harp Forte with double heddles. 
I put in an order with the only Australian Kromski dealer KraftKolour. The upgrade was only $39 and the second heddles $35, which is comparable to Ashford price for a double heddle. The difference being Kromski just adds an additional set behind your current heddle blocks. Ashford, you have to remove your heddle block and put a new one on that holds both heddles. I will have to do a comparison on heddle blocks and how they are made as I am noticing some differences where there might actually be a winner and something to consider for someone looking between the looms. Shipping was a decent price and decent time frame. Nothing interesting to say of the dealer as everything happened smoothly and as expected. 

So I spent about an hour assembling both products, though the second heddle installation was 2 minutes!

Instructions that ended up in the bin!

So I had previously seen a YouTube video by Paradise Fibers and was very glad it was available and well done because the instructions were just black and white pictures....

This was very easy to follow along and I was very glad to have it up on my tv while I was assembling it. 

Assembly was pretty easy per se and only required a common Phillips head screwdriver. The demonstration uses an electric screwdriver just for speed of disassembling the loom.


Lots of screws! And my remote to stop and start the video.
 There is a bit of dissembling to do....actually a lot! So it is more time-consuming than difficult.

The video suggested removing the front and back cloth beam, but I didn't and had no issues. So one less item to worry about.

Installing the ratchet and pawl system is very easy, especially is you put together the loom originally (which I didn't). The hardest part and the one that caused the most swearing is the rare each magnet.

This magnet will stick to everything and you will spend 5mins trying to pry the two magnets apart from each other and then swear when you hear them click back....

This part requires a bit more skill, but if I can pull it off anyone can. You do need a bit of hand strength or a good drill at this stage as there is no pre-drilled hole for the magnet to be screwed in. So you need to position it and then screw it in. It is completely possible, but you need some strength. I have pretty sucky and weak joints so I would say it would be easier for others without joint problems.

New metal ratchet vs old plastic
While the change from plastic to the metal ratchet and pawl is obvious, metal is more hard wearing and can hold a much higher tension. What the rare earth magnet does is to keep the pawl close to the ratchet and not just relying on gravity. Ashford has a similar lock feature, but it only works to lock the ratchet in place once you are at the tension you want. When you unlock it is loose. I do really like this as I sometimes don't have the finger strength to unlock the Ashford ones and I can see them breaking over time.

Kromski new lock system


Ashford lock system


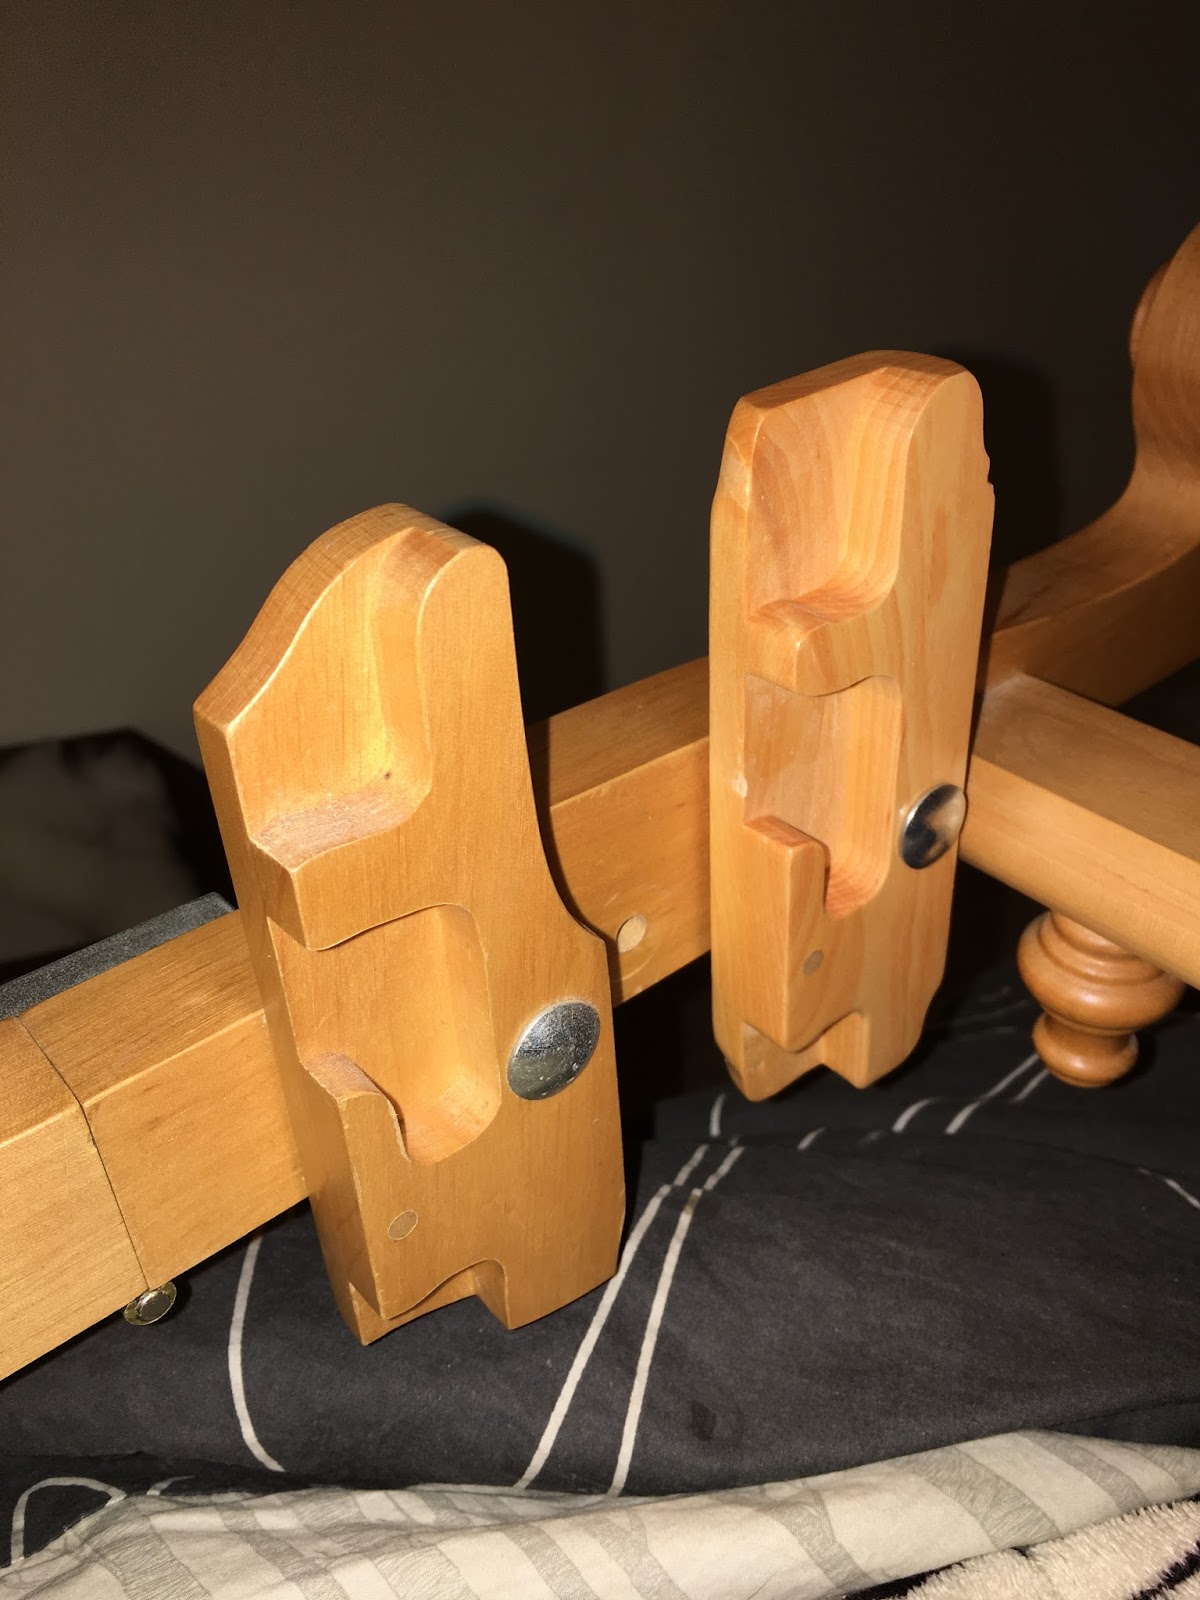
Putting the second set of heddle blocks on was super simple! Just line up with the pre-drilled holes, insert the one screw and tighten. DONE!

Old vs new

It will be interesting to compare how each company approaches the double heddle spacing and how the blocks are shaped. I have a feeling I may like this one over my knitters loom version. Though I still think the winner heddle blocks will be the Majacraft magnet ones I am keen to get and try.

The only thing to consider is with the rare earth magnet is if you have a pacemaker etc. I do have internal bling, so I just avoided dropping it near my internal metal. 


Friday, August 5, 2016

Learning to Weave - Part 2 - Making the Warp

So after kitty chewed on my warping board I grabbed my yarn and started the sometimes tedious but essential step of creating a warp to put on the loom.

Now there seem to be a few ways of warping a loom; front-to-back, back-to-front, directly off the warping board etc. I just followed what was in the Ashford Weaving book I got. It is important to figure which way you are going to warp your loom as it will impact the way you tie up your warp. The way suggested to me by the book has one cross over section.
A full warp like this = 2 ends
The cross I have heard multiple times is super, super important for keeping the threads in order. So for each colour I had to tie up 52 ends. This was 312 ends....My board couldn't cope with it so I divided the colours into two sections. 
I wasn't concerned about length as I only need about 25cm, but wanted more to practice so I just eyeballed a decent length beyond a meter and just did that. 

Rio colours?
You might notice the white thread on the bottom right? This is my counter thread. Every 10 thread I put a tie in there. As my warp colours were 52 ends it got a bit funny so my second warp I just threw those last 2 in the final pile so I had piles of 10,10,10,10, 12
Hard to tell the difference but there is a dark blue in there as well as purple. 
 Once every end is on then I put a million ties in several areas to make sure nothing went bad! I tied the entire warp at each point on the peg, I also tied the cross areas several times so that the cross was kept separate and easy to find. Then off the loom it comes and put in a simple hand-crochet single chain like thing. This allows it to be stored for later.
Add caption
What did I learn at this step? This is where your maths in Part 1 is crucial and planning your colour. As I am doing a simple colour gamp I chose to put the colours in the order they are mentioned on the rainbow.

Another thing I noted was that with 312 ends I will need to thread 312 heddles. In the standard Ashford 60cm 8 Shaft comes with 480 heddles to divide between 8 shafts. Now I didn't set up mine, but one would anticipate 60 heddles per shaft. I will be using 4 shafts to do a basic weave pattern (can be done on 8 but that is insane). So that leaves 240 heddles in my 4 shafts but I need 312...... and need 78 per shaft. So I picked up 3 packs of extra texsolv heddles (100 per pack). So I will add at least 50 more to each of the first 4 shafts and have pack spare.

To do basic weave on a 4 shaft I have to lift 1&3 then 2&4 (if I did it on 8 I would need 1&3&5&7 for one shot and then 2&4&6&8 - too easy confuse). I could do it on just 2 shafts but then I run into even more problems with not enough heddles. As I would be doing way more 4 shaft patterns it makes more sense to fill up the first 4 shafts. I was told this is a common problem, especially when stores set up the looms for people about where to distribute the heddles. I also got told I will never have enough heddles lol.

http://dustbunniesundermyloom.blogspot.com.au/2010/07/comedy-of-errors.html


So now my warp is wound Part 3 will be putting it on the loom without crying....Hopefully my auto ered denter will be in by that time to make this easier :)

Wednesday, August 3, 2016

Learning to Weave - Part 1 - Planning the Project

Ok, maybe not so much teaching you how to weave but watching me learn to weave. So I apologise for inaccuracies I will do my best Following my  mistakes and triumphs. I have the dream loom so what now?! There are guild classes but they are too expensive for me right now. My spinning place does them, but when I am supposed to be at uni. So I am doing a bit of self-directed learning with the ability to ask my spinning/weaving people each weekend.

So I set myself the task of following the NSW Handweavers and Spinners Guild Certificate in Handweaving (CHW) guidelines. They have several levels running for Basic to Master and have the first two levels requirements available on their site. The hope is that after I get through it all I will have something good enough to submit to get my first certificate.

So the first weave is a colour gamp......
GAMP....
GaMp?

When in doubt google, except for medical conditions.
After searching I discovered Gamps in weaving were
"a woven piece of fabric that illustrates what happens when different weave structures, yarns/fibers, colour etc,., intersect."
Thank you Knit Flix
www.weavingtoday.com
A colour gamp looks at the interaction of colour. These can be down in many weave patterns, but thankfully the CHW is just looking for a simple Tabby (meow) plain weave. Also, they have limited the colours to Red, Orange, Green, Blue, Violet, and Yellow each measuring 6.5cm on the reed.

So I picked up these colours from Petlins in a 22/2 Cottolin....
More weird words and numbers.
Cottolin was easy it is a mix of 60% cotton and 40% linen. I picked this over the 100% cotton as there was more variety in colour at the time.
22/2 - this is where it got confusing. This number reflects yarn sizes and involved maths....

The second or lowest number (as sometimes it is written 2/22) reflects the number of plies.
Ok easy.
The other number is the yards in a pound are equal to 11 hanks of 840 yards....
Not so easy...
What I got is bigger numbers tend to = thinner yarns. As cotton has a different weight to linen etc a 22/2 cottolin is not the same size as a 22/2 cotton. In fact, an 8/2 cotton seems to be the equivalent size.

I gave that up after highschool
So now I know the size of my yarn I need to figure out what the sett will be.....

Set point match?

A sett/set is the number of ends per inch (EPI). This is important and to figure this out you also need to know what the desired fabric you want to make is. The higher the sett for you yarn the stiffer, but the lower may make a very open loose weave that looks bad.

This is where I got caught out the most. There is no standard  to work from. After much searching the sett for a 22/2 cottolin ranged from 16 EPI-30EPI. That is a lot of difference. After much researching and talking to more talented people I decided that for a balanced weave I would need a 20EPI.

Inches...but I work in CM I need 6.5CM! So after playing with conversion I am settling for 52 ends per colour to get my 6.5cm. Inches didn't perfectly balance into my cm so I added a couple of extra ends.

I also had the choice between my 12dpi (dents per inch) or 8dpi reed. SO I have picked the 12 and will have to sley. Is I couldn't simply put one yarn through each dent I had to figure out a substitution through this lovely chart.

So I to get the required epi of 20 I would need to sley my 12dpi reed following this pattern: 1-2-2 (repeat till insane). Simple as mud right!

So hopefully the hard part is over now and I just have to warp, weave and finish.....
How I feel!


 Now onto making my warp!
moments later he left teeth marks on it

*I have tried to translate the weaving language, but if something didn't make sense go to this lovely set of weaving terms. I will start up my own page of terms as I learn them too!


Monday, August 1, 2016

Will it Blend?

Unlike the famous YouTube Channel this blending is much less dangerous to one's health. Our group has been doing a bit of a project. From Ashford's The Wheel magazine  (issue 26, 2015) Raeleen's Wrap.

This project requires the blending of many Ashford slivers. Spun as singles and then felted. Other members have been experimenting with different colours, thickness, and needle size resulting in some beautiful results and also learning techniques in blending for the desired look. So this was my time.

Apparently, my throw everything on the board approach doesn't work
Mixture of the following Ashford Slivers
- Amethyst
- Aubergine
- Raspberry
- Chocolate
- Olive
- Butterscotch
- Green Tea
- Toffee
- Cherry Red
- Fern Green
- Cheesecake

So I separated the silvers into equal piles and went to work. As I wanted to avoid getting muddy colours I worked with long lengths of colours. So here are the lovely results.


Pretty Punis!

It felt lovely painting the fleece and getting such immediate pretty results.
I got to play with the tutors blending board, while I have my own it is quite old and needs to remain on the table and held down with a heavy clamp. The Ashford Blending board is a lot nicer and can be  placed in the lap.


My board carder, functional but UGLY

I'm slowly getting better at the skill. Ashford does a lovely video about how to blend. Much. Better than anything I could write here so I will link to them for a lovely visual (and colourful) lesson in blending.


Now to make sure I keep up with my colour theory!

Twitter Delicious Facebook Digg Stumbleupon Favorites More